domingo, novembro 10, 2024

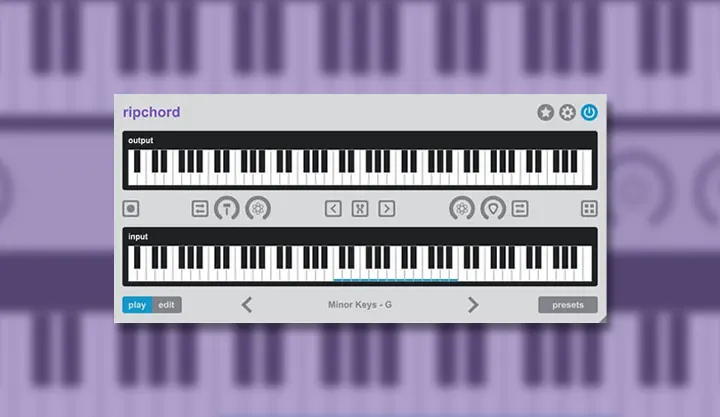
Semana do MIDI: Ripchord is a free MIDI plugin for creating and remixing chord progressions.


Ripchord is a free MIDI plugin for creating and remixing chord progressions. You can create custom chord presets from scratch, load expansion packs, or import any MIDI file that contains chords and Ripchord will automatically create a preset from it. Ripchord helps you easily compose progressions by playing single notes to trigger full chords. You can watch the tutorial on YouTube: Ripchord Overview

Expansion Packs

Anyone is welcome to make expansion packs for Ripchord, and give them away or sell them, without any further permission required. We don't sell any expansion packs directly, or take any kind of cut from third party expansion pack sales.

Open Source

Ripchord is open source under GNU GPLv3. You can check out the source code on Github: Source Code

Plugin Formats

Ripchord is avalailable as an AU or VST3 for Mac, and a VST3 for Windows. We get a lot of requests for a VST2 version of Ripchord. Actually the first version of Ripchord we made was a VST2, and then we found out that Steinberg would not let us give it to anyone. Steinberg stopped granting any new VST2 licenses in 2018 because they are trying to retire the format, so unfortunately that is the end of the story. This also means that whatever DAW you use must support the full VST3 MIDI spec in order to use Ripchord. More details can be found here: VST2 is Discontinued

Play Mode

Ripchord has two modes, play and edit. Most of the time you will be in play mode, in which you can either play an external MIDI keyboard, or click on the input keys with a mouse, in order to trigger the chords in your preset and compose progressions.


1.

(Button) Favorites or unfavorites the currently loaded preset.

2.

(Button) Opens the menu.

3.

(Button) Allows the chords to be enabled or disabled while maintaining the MIDI routing.

4.

(Button) Contains any MIDI that has been recorded. When it is fully illuminated you can click and drag the MIDI from this button into your DAW.

5.

(Button) Switches between the presets view and the keyboards view.

6.

(Display) The name of the currently loaded preset will be displayed here.

7.

(Arrows) Select the next or previous presets in your collection. You can also use the left, right, up, and down keys on your computer's keyboard to trigger these buttons.

8.

(Button) Switches between play and edit mode.

9.

(Button) Clicking once enables MIDI recording. When enabled, recording will begin the moment the first input note is recieved. Clicking this button a second time will disable MIDI recording.

10.

(Button) Switches the direction of the velocity strum between always LTR, always RTL, LTR then alternate, or RTL then alternate. It can only be clicked if the velocity strum knob has been engaged.

11.

(Knob) Increases the velocity strum, which is the difference in velocity between the first and last notes of a chord. The difference will be spread evenly across all of the notes.

12.

(Knob) Increases the velocity humanization, which is random variation in velocity between all of the notes in the chord.

13.

(Button) Moves the transpose keys to the left on the input keyboard. It can only be clicked if the transpose button has been engaged.

14.

(Button) Engages the transpose keys. When engaged, the bottom two octaves of the input keyboard will operate in latch mode to transpose the chords in the preset up or down one full octave.

15.

(Button) Moves the transpose keys to the right on the input keyboard. It can only be clicked if the transpose button has been engaged.

16.

(Knob) Increases the note humanization, which is random variation in timing between all of the notes in the chord.

17.

(Knob) Increases the note strum, which is the difference in timing between the first and last notes of a chord. The difference will be spread evenly across all of the notes.

18.

(Button) Switches the direction of the note strum between always LTR, always RTL, LTR then alternate, or RTL then alternate. It can only be clicked if the note strum knob has been engaged.

Edit Mode

Edit mode can be used to create a new preset from scratch, or to edit an existing preset. In edit mode, when you mouse click on the input keys, instead of triggering the chord, it will select the input key so that you can assign or modify the output keys that are mapped to it. You can still trigger the chords in edit mode if you have an external MIDI keyboard hooked up, that way you can preview the chords as you edit them.


The MIDI Association MIDI 2.0 Specifications (Complete) PDF [FREE]


MIDI 2.0 is an extension of MIDI 1.0. It does not replace MIDI 1.0 but builds on the core principles, architecture, and semantics of MIDI 1.0.

A foundational architecture for MIDI 2.0 expansion is defined by the MIDI Capability Inquiry (MIDI-CI) specification. MIDI-CI allows Devices with bidirectional communication to agree to use extended MIDI capabilities beyond those already defined in MIDI 1.0, while carefully protecting backward compatibility.

MIDI 2.0 is not a stand-alone specification. Manufacturers and developers must have a thorough understanding of MIDI 1.0 in order to implement MIDI 2.0.

MIDI 2.0 Core Specifications:

These documents make up the MIDI 2.0 Core Specifications. Please click on individual name to access details for document:

  • MIDI 2.0 Specification Overview

  • MIDI Capability Inquiry (MIDI-CI)

  • Common Rules for MIDI-CI Profiles

  • Common Rules for MIDI-CI Property Exchange

  • Universal MIDI Packet (UMP) Format an MIDI 2.0 Protocol

  • MIDI Clip File Specification (SMF format for UMP)

Protocol

The MIDI 2.0 Protocol is an extension of the MIDI 1.0 Protocol. Architectural concepts and semantics remain the same as MIDI 1.0. Compatibility for translation to/from the MIDI 1.0 Protocol is given high priority in the design of the MIDI 2.0 Protocol.

Compared to the MIDI 1.0 Protocol, MIDI 2.0 Protocol messages have extended data resolution for all Channel Voice Messages. New properties have been added to some Channel Voice Messages, and new Channel Voice Messages have been added with greatly improved Per-Note control and much more musical expression.

Property Exchange

Property Exchange is part of the MIDI Capability Inquiry (MIDI-CI) specification and MIDI 2.0. Property Exchange is a method for getting and setting various data, called Resources, between two Devices. Resources are exchanged inside two payload fields of System Exclusive Messages defined by MIDI-CI, the Header Data field and Property Data field. This document defines only the contents of the Header Data and Property Data fields. For information on how to transmit and receive these Resource payloads inside MIDI-CI System Exclusive messages, see the MIDI Capability Inquiry specification and Common Rules for MIDI-CI Property Exchange specification.

Profiles

A Profile is a defined set of rules for how a MIDI receiver device implementing the Profile shall respond to a chosen set of MIDI messages to achieve a particular purpose or to suit a particular application.

Included:

1. MIDI 2.0 Core Specifications

- MIDI 2.0 Specification Overview

- MIDI Capability Inquiry (MIDI-CI)

- Common Rules for MIDI-CI Profiles

- Common Rules for MIDI-CI Property Exchange

- Universal MIDI Packet (UMP) Format an MIDI 2.0 Protocol

- MIDI Clip File Specification (SMF format for UMP)


2. Protocol

- Universal MIDI Packet (UMP) and MIDI 2.0 Protocol Specification

- MIDI 2.0 Bit Scaling and Resolution

3. Property Exchange

- Core Property Exchange

- Property Exchange Foundational Resources

- Property Exchange Channel Resources

- Property Exchange Programlist Resource

- Midi-ci Property Exchange Controller Resources

- Property Exchange Get And Set Device State

- Property Exchange Mode Resources

- Common Rules For Midi-CI Property Exchange

- Property Exchange Localon Resource

- Property Exchange Externalsync Resource

4. Profiles

- Common Rules For Midi-ci Profiles

- Midi-CI Profile: Default Control Change Mapping

- Midi-CI Profile For Midi Polyphonic Expression

- Midi-CI Profile For Note On Selection Of Orchestral Articulation

- Midi-CI Profile For Drawbar Organs (Single Channel)

- Midi-CI Profile For Rotary Speaker

- Midi-CI Profile For General Midi 2 (Function Block)

- Midi-CI Profile For General Midi 2 Single Channel


home page

https://midi.org/midi-2-0


sexta-feira, novembro 08, 2024

Uma prenda (gift) para os leitores do Musicando!


A gift for Musicando readers!
A mini kit for Kontakt, with shaker and tambourine loops. Finally two Heavy Metal drum loops.

Uma prenda para todos os leitores. Um mini kit para Kontakt, com loops de shaker e tambourine. Por fim dois loops de bateria Heavy Metal.

https://usersdrive.com/7gl1z39bfqy8.html

quarta-feira, novembro 06, 2024


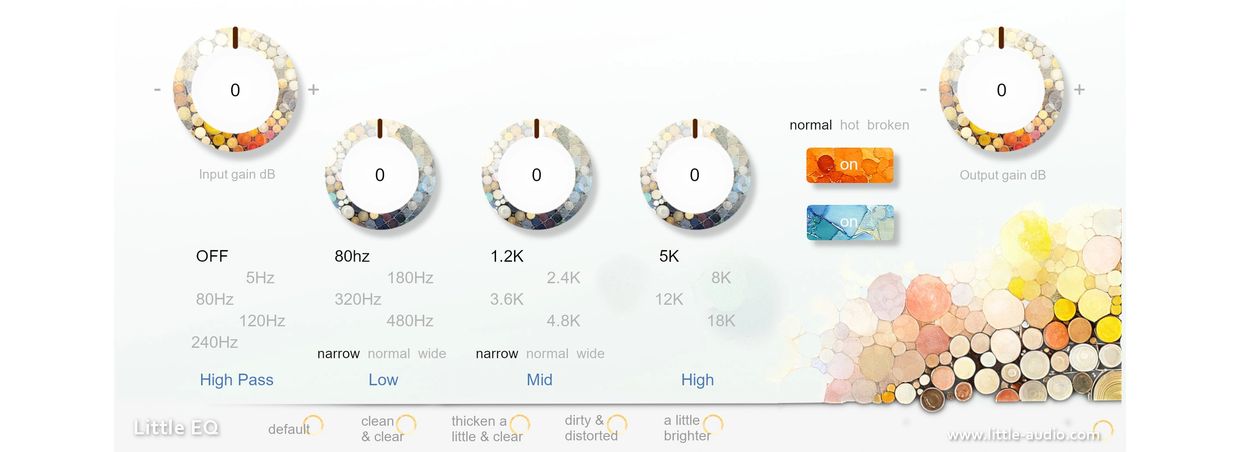
Little EQ is an equalizer plugin that brings to life the sound of a passive filter and an output transformer.

Download for free

Currently, Little EQ is available only on Windows.

Please unzip the file and move LittleEQ.vst3 to "C:\Program Files\Common Files\VST3."


https://little-audio.com/little-eq

terça-feira, novembro 05, 2024

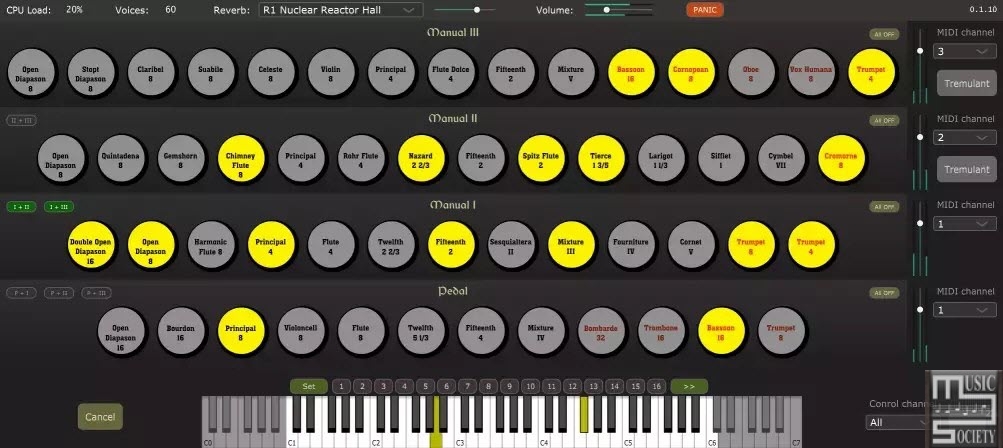
Arthur Benilov Aeolus (Pipe Organ Synthesizer) v0.2.0 x64 VSTI VSTI3 AU Standalone Windows MacOS Linux [FREE]


 Pipe organ emulator using additive synthesis as a VST or AU plugin (or a stand-alone executable).Aeolus was originally developed by Fons Adriaensen and presented in 2004. The original implementation is Linux only and can be found here (or across Linux distribution packages). At present it looks like Aeolus development has been mostly abandoned (but Organnery picked up the original Aeolus project to make it run on a Raspberry Pi).

This project leverages the wavetable systhesis part of the original Aeolus, improves on it, and delivers it as a standard VST plugin using JUCE framework, so that it can be run in Windows/macOS VST3/AU hosts.

This implementation contains additional improvements to the sound generation including:

  • Pipe models can be composed of multiple pipes (to create proper mixtures);
  • Different pipe models can be used across the keyboard compass (this enables mixtures breaking-back);
  • Pipes chiff noise is played on attack;
  • The plugin uses zero delay convolutional reverb with selectable IRs from OpenAir library;
  • Registration presets also act as a sequencer.
  • pipes chiff noise on attack;
  • new pipe models;
  • convolutional reverb.

The original binary format for the pipe models and the organ configuration has been translated (partially) to JSON.

MIDI Control:

Sequencer steps are controlled via the program change messages sent on the control MIDI channel (program 0 corresponds to the first step of the sequencer, 1 – to the second and so on).

In a DAW you may use Program parameter to control the sequencer steps. Another way to control the sequencer is via key switches (MIDI notes). The default configuration uses keys 22 and 23 to control the sequencer.

CCs:

CC 1 modulation wheel enables/disables tremulant

CC 7 controls the global volume (on the control MIDI channel) and the volume of each division which has swell config flag enabled (on the swell MIDI channel)

CC 91 controls the reverb output level

CC 98 Stops control

👉 The stops control follows the original Aeolus convention. The control mode is set by the message 01mm0ggg, where mm is the control mode, and ggg is the control group (division number, counter from the top starting from 0). Control modes are:

00 Disable the division (all stops are off)

01 Set stop off

10 Set stop on

11 Toggle

Once the control message is received the value of the format 000bbbbb will execute the selected control mode action on specified stop buton bbbbb, counted from 0.

Custom organ configuration:

Custom organ configuration will be loaded by the plugin if found at Documents/Aeolus/organ_config.json location.

👉 The Documents folder’s exact location depends on the operating system and the user profile.

To create the organ_config.json start with default one embedded into the plugin by copying it to Documents/Aeolus folder and renaming to organ_config.json.

It is also possible to use custom pipe configs in .ae0 or .json format. These have to be placed to the Documents/Aeolus folder for then can be referenced from the organ_config.json (use pipe file name without the extension in the“pipe“attribute of the organ_config.json).

Multibus output:

When compiled with the WITH_MULTIBUS_OUTPUT CMake option enabled, the generated plugin will ouput to the 8 separate monofonic buses. Each bus corresponds to the pipes groups placement in space according to the internal horizontal arrangement of the pipes.

In multibus configuration there is no reverb applied, and there is no spatialization performed.

👉 The multibus mode is indended for the object based mixing, where you could place individual pipe groups in space yourself and apply a reverb of your preference.

Pipes are arranged starting from the lowest key from the sides (buses 0 and 7) to the center in the middle of the range (buses 3, 4), and then going back from the centre towards the sides. For the pedal pipes, they go from the outside towards the centre only.

Corresponding pipe position jumps between left and right following the keys (C will be on the left, C# on the right, D of the left, D# on the right and so on).

👉 This very same pipes spatial arrangement is used in the stereo version of the plugin to perform spatialized rendering followed by a stereo convolutional reverb.

https://github.com/Archie3d/aeolus_plugin?tab=readme-ov-file

Polarity Audio Reverb And Delay Calculator (Inside Your DAW) v1.0.0 VST3 AU WiN MAC [FREE]

Reverb & Delay Calculator calculating reverb & delay calculations and even release time usage. With the Synchronized with DAW featur...